# OAuth2
OAuth2 is commonly used to allow authentication of a user using a third-party server (in this case, simple-auth). While it's a bit harder to implement than the simple API, Vouch, or Gateway, it's a standard that will be supported by many applications and can scale as needed.
simple-auth supports standard OAuth2, as well as OpenID Connect (OIDC).
TIP
If you're unfamiliar with OAuth2, and want to learn more, please scroll See Also to find some resources.
# Configuration
# Quick Start
To use OAuth2, you need a configuration structure as follows below.
WARNING
The client_id is displayed to the user, while the client_secret should be kept secret.
authenticators:
  oauth2:
    clients:
      test-abc: # Your "client_id"
        name: Test Company             # Name displayed to the user during login
        author: Me                     # Author dispalyed to the user
        authorurl: "http://zdyn.net"   # Link to the author's site
        secret: test-secret            # Your "client_secret". Should be random and secure
        redirecturi: "http://localhost:3050/auth-callback" # In the UI flow (if active), where to redirect back to with a grant `code`
# Enabling OpenID Connect (OIDC)
Simple-auth also supports OIDC. In order to enable, you need to provide a signing method and key to the OAuth2 configuration. You can also use a Signing Key-Pair here.
authenticators:
  oauth2:
    clients:
      test-abc:
        # .. client config ..
        oidc:
          signingmethod: hs256
          signingkey: lakshjdf089yh2ui4jahsdf
# ID Token (OIDC)
TIP
If you need more information, or libraries to decode and verify a JWT, please take a look at jwt.io (opens new window)
WARNING
It is important to keep in mind that a JWT is obfuscated, but not encrypted. Anyone can see the contents of a JWT, but only individuals with the signingkey can make a new, verifiable, JWT.
The id_token is a JWT that looks like:
eyJhbGciOiJIUzI1NiIsInR5cCI6IkpXVCJ9.eyJhdWQiOiJ0ZXN0LWFiYyIsImV4cCI6MTYxMzcxOTIzOCwiaXNzIjoic2ltcGxlLWF1dGgiLCJzdWIiOiJjN2U5ZjkwNS1iY2Q4LTQ2ZGEtOGYyNy0xMDViYTBmM2YzMjUiLCJlbWFpbCI6InRlc3RAZXhhbXBsZS5jb20ifQ.wSZhf7u9dzFJWId2pi5cjoBcw-SLOgJzGD3oahMCU6s
When decoding it, you'll see the following fields:
{
  "aud": "test-abc",                              // client_id
  "exp": 1613719238,                              // Expiration (same as access token)
  "iss": "simple-auth",                           // Issuer (as defined in config)
  "sub": "c7e9f905-bcd8-46da-8f27-105ba0f3f325",  // Account ID
  "email": "test@example.com"                     // If email scope is set, email will be available
}
# Scopes
You can add arbitrary scopes to the OAuth2 request, however, they need to be defined ahead of time.
simple-auth also has a few pre-defined scopes that can be used to access user information:
emailwill give access to the email in the JWT or upon token Introspectionusernamewill give access to the common-name of the account in the JWT or upon token Introspection
If you want to allow using these, or other, scopes, you specify them like this:
authenticators:
  oauth2:
    clients:
      test-abc:
        # .. client config ..
        scopes: ['email', 'whatever', 'abc']
# Advanced Config
In addition to the configuration above, there are other configurable settings you can tweak to gain more control over how simple-auth issues tokens.
# Settings
Settings are non-client-specific group of configuration for OAuth2. They are as follows:
authenticators:
    oauth2:
        webgrant: true # Whether to allow web-grant (UI) or not
        settings:
            codeexpiresseconds: 60 # How soon a code will expire
            tokenexpiresseconds: 21600 # How long until an access_token expires; 6 hours
            codelength: 6           # Length of "code" in the authorization_code grant
            allowautogrant: true    # if true, will auto grant a new request if it matches a previous and authenticated request
            reusetoken: true        # if true, will reuse an existing token instead of creating a new one when possible
            allowcredentials: false # If the `password` grant_type is supported
            issuer: "simple-auth"   # Name of the OAuth2 token issuer (Using in token and JWT)
            issuerefreshtoken: false # Whether or not to issue a refresh token
            revokeoldtokens: true   # When issuing a new token, revoke all previously issued tokens of a lessor type
# Per-Client Overriden Settings
There is a common settings section that will be applied to all OAuth2 clients. In addition to providing a value here, you may also override this value in each client.
For example,
authenticators:
  oauth2:
    settings:
      codeexpiresseconds: 60 # How soon a code will expire
    clients:
      test-abc:
        codeexpiresseconds: 10 # Overriden for this specific client
# Obtaining a Token
There are several ways to obtain an access_token, refresh_token, and/or id_token:
# UI Grant Flow
To allow someone to sign in via a web-flow, you need to make sure the redirecturi is set correctly in your configuration, then you:
# 1. Redirect the user
Redirect To: https://simple-auth.example.com/oauth2
Query Params:
client_idYour client_id as specified in configresponse_typeShould always becodescopeshould be a space-separated list of scopes requested (Must be contained within the list of possible scopes in the config, otherwise an error will be shown)redirect_uriWhere simple-auth should redirect the user back to upon successful grant (Must match config)state(optional) any arbitrary state or unique key that will be passed back to the redirect endpoint upon successful grant
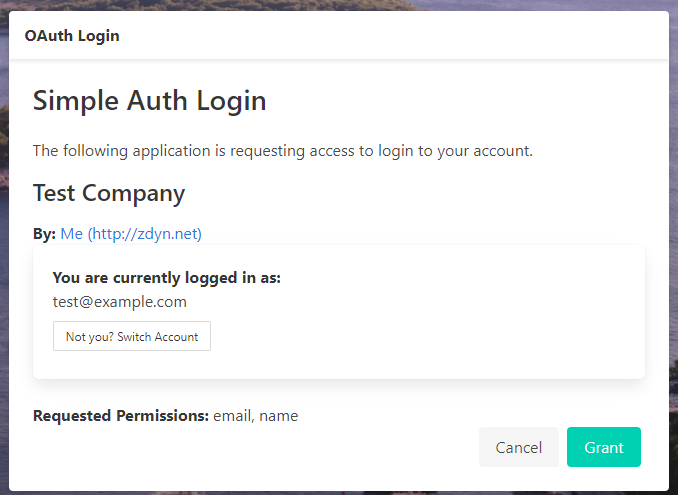
The user will be shown a screen that allows them to Sign-in or Create an account. Once they are signed in it will ask the user to Grant the scopes you've asked for in the request to the application.
Upon Successful Grant
If the user accepts, a short-lived code will be generated, and the user will be redicted back to your redirecturi with the following query parameters:
codeA short-lived code that may be exchanged for a tokenstateIf the state was set in the request, it will be returned verbatim
# 2. Trade Code for Token
TIP
For the following requets, you can send JSON, or form-encoded data.
Once the server has the code, you should trade it for an access_token. If configured, a refresh_token and/or id_token will also be issued.
POST https://simple-auth.example.com/api/v1/oauth2/token
{
  "client_id": "test-abc",
  "client_secret": "test-secret",
  "grant_type": "authorization_code",
  "redirect_uri": "http://localhost:3050/auth-callback",
  "code": "12356"
}
Response
{
  "access_token": "916e3df5-bbd1-4c58-9b62-b5ce3748769b",
  "token_type": "Bearer",
  "expires_in": 21600,
  "refresh_token": "566152b9-ec41-4709-aa2e-c74b195e6632",
  "id_token": "eyJhbGciOiJIUzI1NiIsInR5cCI6IkpXVCJ9.eyJhdWQiOiJ0ZXN0LWFiYyIsImV4cCI6MTYxMzcxOTIzOCwiaXNzIjoic2ltcGxlLWF1dGgiLCJzdWIiOiJjN2U5ZjkwNS1iY2Q4LTQ2ZGEtOGYyNy0xMDViYTBmM2YzMjUiLCJlbWFpbCI6InRlc3RAZXhhbXBsZS5jb20ifQ.wSZhf7u9dzFJWId2pi5cjoBcw-SLOgJzGD3oahMCU6s",
  "scope": "email name"
}
# 3. Validate (Optional)
While receiving a 200 OK should be enough to signal that the user was logged in, if you'd like to verify the data wasn't altered in transit, there are two steps that can be taken:
- Introspect the token (Will also give more information about the user, if scopes allow)
- Verify the JWT
Instructions on how to do both can be found in the Validating Token section.
# Credentials
WARNING
While part of the official spec, the credentials endpoint largely defeats the point of OAuth by letting a 3rd party application receive and process a user's credentials. Please take care in allowing this endpoint to be enabled. It is disabled by default
TIP
To enable, set authenticators.oauth2.settings.allowcredentials (or per-client override) to true
You can login by making a backend API request to an endpoint with the user's credentials. While this largely defeats the point of OAuth (Which is, the consuming app never sees the credentials), it is supported and can be useful in various front-end applications.
Please note, this will only work for local accounts (and not 3rd party accounts via OIDC, etc.)
# Request
POST /api/v1/auth/oauth2/token
{
  "grant_type": "password",
  "username": "oauthtest", // This can also be an email
  "password": "test-pass",
  // If the user has TOTP enabled, a code will need to be provided.
  // It also must be enabled on the server
  "totp": "12356",
  "scope": "email", // Optional space-separated scopes
  "client_id": "testid",
  "client_secret": "client-secret"
}
# Response
{
  "access_token": "916e3df5-bbd1-4c58-9b62-b5ce3748769b",
  "token_type": "Bearer",
  "expires_in": 21600,
  "refresh_token": "566152b9-ec41-4709-aa2e-c74b195e6632",
  "id_token": "eyJhbGciOiJIUzI1NiIsInR5cCI6IkpXVCJ9.eyJhdWQiOiJ0ZXN0LWFiYyIsImV4cCI6MTYxMzcxOTIzOCwiaXNzIjoic2ltcGxlLWF1dGgiLCJzdWIiOiJjN2U5ZjkwNS1iY2Q4LTQ2ZGEtOGYyNy0xMDViYTBmM2YzMjUiLCJlbWFpbCI6InRlc3RAZXhhbXBsZS5jb20ifQ.wSZhf7u9dzFJWId2pi5cjoBcw-SLOgJzGD3oahMCU6s",
  "scope": "email"
}
# Refresh Token
TIP
In order to receive a refresh token, authenticators.oauth2.settings.issuerefreshtoken (or per-client override) needs to be true.
Since access_tokens are relatively short-lived, if you have a refresh_token issued previously, you can use it to receive a new access_token. In the response, you will not be issued a new refresh_token or id_token (those can only be obtained via a fresh login).
# Request
POST /api/v1/auth/oauth2/token
{
  "grant_type": "refresh_token",
  "refresh_token": "your-refresh-token",
  "client_id": "test-abc",
  "client_secret": "test-secret"
}
# Response
{
  "access_token": "916e3df5-bbd1-4c58-9b62-b5ce3748769b",
  "token_type": "Bearer",
  "expires_in": 21600,
  "scope": "email name"
}
# Validating Token
# Introspect Endpoint
The introspect endpoint will return you more information about either a refresh_token or access_token (but not id_token). If scopes allow, you may be able to see things such as email or username.
# Request
POST /api/v1/auth/oauth2/token_info
With the body (JSON or form-encoded):
token=abc-123
# Success Response
200 OK
{
  "active": true,
  "scope": "email name",
  "client_id": "test-abc",
  "token_type": "access_token",
  "iat": 1613697638,
  "exp": 1613719238,
  "sub": "c7e9f905-bcd8-46da-8f27-105ba0f3f325",
  "aud": "test-abc",
  "iss": "simple-auth",
  "email": "test@example.com"
}
# Error Response
200 OK
{
  "active": false
}
# ID Token JWT Signature Validation
WARNING
One of the downsides of using JWT is it's possible to have revoked a OAuth client, but because the JWT was signed and can be validated without communicating to the server, it will still be valid for the life of the token.
There are many examples on jwt.io (opens new window) about how to validate a JWT (the id_token). simple-auth follows this standard. Your key will be the signingkey you specified in the client configuration (or the public key if you used a key-pair).
# Example Client
The code below is a simple example client that will issue a redirect to the OAuth2 endpoint with some scopes, accept a return response, trade in the code for a token,introspect the token, and display.
Config
authenticators:
  oauth2:
    clients:
      test-abc:
        name: Test Company
        author: Simple-Auth
        authorurl: "http://zdyn.net"
        secret: test-secret
        redirecturi: "http://localhost:3050/auth-callback"
        issuerefreshtoken: true
        scopes: ['email', 'name']
        oidc:
          signingmethod: hs256
          signingkey: lakshjdf089yh2ui4jahsdf
oidctest.js
#!/usr/bin/env node
const express = require('express');
const axios = require('axios');
const config = require('./config');

const app = express();

// Simple page. You can either put the values in a form, or redirect back to your site, and then to simple-auth
const pageHome = `
<html>
  <head><title>OIDC Test</title></head>
  <body>
    <h1>OIDC Login</h1>
    <form action="${config.oauthGrantEndpoint}" method="GET">
      <input type="hidden" name="client_id" value="${config.clientId}">
      <input type="hidden" name="response_type" value="code">
      <input type="text" name="scope" value="email name">
      <input type="hidden" name="redirect_uri" value="${config.myUrl}/auth-callback">
      <button type="submit">Login</button>
    </form>
  </body>
</html>
`;
app.get('/', (req, res) => {
  res.send(pageHome);
});

function tradeCodeForAccessToken(code) {
  return axios.post(config.tokenEndpoint, {
    client_id: config.clientId,
    client_secret: config.clientSecret,
    grant_type: 'authorization_code',
    redirect_uri: `${config.myUrl}/auth-callback`,
    code,
  }).then((resp) => resp.data);
}

app.get('/auth-callback', (req, res) => {
  const { code } = req.query;

  tradeCodeForAccessToken(code)
    .then((token) => axios.post(config.introspectEndpoint, { token: token.access_token })
      .then((resp) => ({ token, introspect: resp.data })))
    .then((data) => res.send(data))
    .catch((err) => {
      console.log(err);
      res.redirect('/');
    });
});

app.listen(config.port, () => {
  console.log(`Listening on http://0.0.0.0:${config.port}`);
});
config.js
module.exports = {
  port: 3050,
  myUrl: 'http://localhost:3050',
  oauthGrantEndpoint: 'http://localhost:9002/oauth2',
  tokenEndpoint: 'http://localhost:9002/api/v1/auth/oauth2/token',
  introspectEndpoint: 'http://localhost:9002/api/v1/auth/oauth2/token_info',
  clientId: 'test-abc',
  clientSecret: 'test-secret',
};